Security
IPTables & SELinux
IPTables & SELinux
iptables is the userspace command line program used to configure the Linux 2.4.x and later packet filtering ruleset. It is targeted towards system administrators.-- netfilter.org
iptables is the userspace CLI to configure firewall rules on Linuxip6tables applies to IPv6 filtersarptables applies to ARP filtersebtables applies to Ethernet frame filtersINPUT, OUTPUT and
FORWARD) that are checked against any network traffic (IP packets)
relevant to the packetDROP and ACCEPT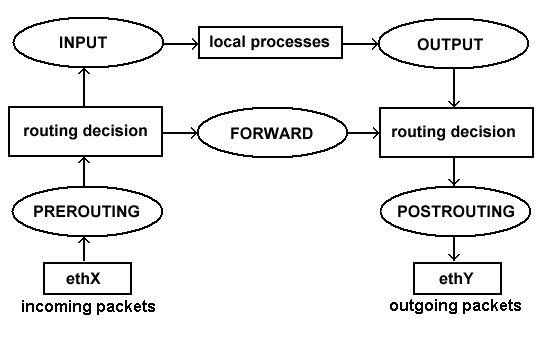
INPUTOUTPUTFORWARDACCEPT or DROP)ACCEPT
or DROP the packet.$ lsmod | grep ip_tables
ip_tables 27240 1 iptable_filter
$ iptables -L
Chain INPUT (policy ACCEPT)
target prot opt source destination
Chain FORWARD (policy ACCEPT)
target prot opt source destination
Chain OUTPUT (policy ACCEPT)
target prot opt source destination
$ iptables -S
-P INPUT ACCEPT
-P FORWARD ACCEPT
-P OUTPUT ACCEPT
$ yum install iptables-services
$ systemctl start iptables
$ iptables -L
Chain INPUT (policy ACCEPT)
target     prot opt source     destination
ACCEPT     all  --  anywhere   anywhere     state RELATED,ESTABLISHED
ACCEPT     icmp --  anywhere   anywhere
ACCEPT     all  --  anywhere   anywhere
ACCEPT     tcp  --  anywhere   anywhere     state NEW tcp dpt:ssh
REJECT     all  --  anywhere   anywhere     reject-with icmp-host-prohibited

Chain FORWARD (policy ACCEPT)
target     prot opt source     destination
REJECT     all  --  anywhere   anywhere     reject-with icmp-host-prohibited

Chain OUTPUT (policy ACCEPT)
target     prot opt source     destination
$ iptables -S
-P INPUT ACCEPT
-P FORWARD ACCEPT
-P OUTPUT ACCEPT
-A INPUT -m state --state RELATED,ESTABLISHED -j ACCEPT
-A INPUT -p icmp -j ACCEPT
-A INPUT -i lo -j ACCEPT
-A INPUT -p tcp -m state --state NEW -m tcp --dport 22 -j ACCEPT
-A INPUT -j REJECT --reject-with icmp-host-prohibited
-A FORWARD -j REJECT --reject-with icmp-host-prohibited
systemctl stop iptables
iptables -P INPUT ACCEPT
iptables -F
iptables -A INPUT -i lo -j ACCEPT
iptables -A INPUT -m state --state ESTABLISHED,RELATED -j ACCEPT
iptables -A INPUT -p tcp --dport 22 -j ACCEPT
iptables -P INPUT DROP
iptables -P FORWARD DROP
iptables -P OUTPUT ACCEPT
iptables -L -v
iptables -P INPUT ACCEPTINPUT chain to ACCEPT otherwise once we flush the current rules we
will be locked out of our server.iptables -F-F switch to flush all existing rules so we start with a clean
state from which to add new rules.iptables -A INPUT -i lo -j ACCEPT
-A switch to append (or add) a rule to a specific chain, the
INPUT chain in this instance.-i switch (for interface) to specify packets matching or
destined for the lo (localhost, 127.0.0.1) interface-j (jump) to the target action for packets matching the rule -
in this case ACCEPT.iptables -A INPUT -m state --state ESTABLISHED,RELATED -j ACCEPT
-A)
it to the INPUT chain.-m switch to load a module (state).NEW, ESTABLISHED or RELATED.NEW refers to incoming packets that are new incoming connections that
weren't initiated by the host system.ESTABLISHED and RELATED refers to incoming packets that are part of an
already established connection or related to and already established
connection.iptables -A INPUT -p tcp --dport 22 -j ACCEPT
iptables -P INPUT DROP
-P switch sets the default policy on the specified chain.INPUT chain to DROP.iptables -P FORWARD DROPFORWARD chain to
DROP as we're not using our computer as a router so there should not be
any packets passing through our computer.iptables -P OUTPUT ACCEPTOUTPUT chain to
ACCEPT as we want to allow all outgoing traffic (as we trust our users).iptables -L -v-L) the rules we've just added to check they've been
loaded correctly.$ service iptables save
iptables: Saving firewall rules to /etc/sysconfig/iptables:[ OK ]
$ cat /etc/sysconfig/iptables
# Generated by iptables-save v1.4.21 on Mon Mar 7 20:49:54 2016
*filter
:INPUT DROP [37:12136]
:FORWARD DROP [0:0]
:OUTPUT ACCEPT [57:5712]
-A INPUT -i lo -j ACCEPT
-A INPUT -m state --state RELATED,ESTABLISHED -j ACCEPT
-A INPUT -p tcp -m tcp --dport 22 -j ACCEPT
COMMIT
# Completed on Mon Mar 7 20:49:54 2016
# Manually saving or restoring
$ iptables-save > /etc/sysconfig/iptables
$ iptables-restore < /etc/sysconfig/iptables
Security-Enhanced Linux (SELinux) is an implementation of a mandatory access control mechanism in the Linux kernel, checking for allowed operations after standard discretionary access controls are checked. SELinux can enforce rules on files and processes in a Linux system, and on their actions, based on defined policies.-- redhat.com
$ sestatus
SELinux status:                 enabled
SELinuxfs mount:                /sys/fs/selinux
SELinux root directory:         /etc/selinux
Loaded policy name:             targeted
Current mode:                   permissive
Mode from config file:          permissive
Policy MLS status:              enabled
Policy deny_unknown status:     allowed
Max kernel policy version:      28
$ getenforce
Permissive
$ setenforce 1
$ getenforce
Enforcing
$ sestatus
SELinux status:                 enabled
SELinuxfs mount:                /sys/fs/selinux
SELinux root directory:         /etc/selinux
Loaded policy name:             targeted
Current mode:                   enforcing
Mode from config file:          permissive
Policy MLS status:              enabled
Policy deny_unknown status:     allowed
Max kernel policy version:      28
$ yum install -y httpd && touch /var/www/html/index.html
$ ls -Z /var/www/html/index.html
-rw-r--r--. root root unconfined_u:object_r:httpd_sys_content_t:s0 /var/www/html/index.html
-Z switch will work on most utilities to show SELinux security
contextssystem_u:object_r:httpd_sys_content_tuser:role:type:mlsuser:role:type fields are displayed and mls is hidden.httpd_sys_content_t.Now consider the SELinux security context of the Apache web server process:
httpd
$ systemctl start httpd
$ ps axZ | grep httpd
system_u:system_r:httpd_t:s0     2744 ?        Ss     0:00 /usr/sbin/httpd -DFOREGROUND
httpd_t type domain.Finally, let's look at the SELinux security context of a file in our home directory:
$ sudo -u centos touch /home/centos/foo
$ ls -Z /home/centos/foo
-rw-r--r--. centos centos unconfined_u:object_r:user_home_t:s0 /home/centos/foo
user_home_t, the default type for files in a
user's home directory.httpd_t
can read /var/www/html/index.html of type httpd_sys_content_t.httpd_t domain and does not have the
userid:username, it can not access /home/centos/foo even though this
file is world readable because /home/centos/foo SELinux security context
is not of type httpd_t.httpd_t domain (which prevents escalation of privileges) or access any
file not in an httpd_t related domain.