Storage
Virtualizing storage
- Partitions have limitations
- Storage needs to be flexible
- Large storage management
- Adding, removing, expanding storage hot swap
Utilizing storage more efficiently
- Grow the storage as needed
- Only allocate the minimum you need
- Expect to make changes to your storage later
- Fully utilize the physical media
Storage Snapshots
- Perform consistent backups atomically
LVM
Logical Volume Manager

Components of LVM
| Name | Description |
|---|---|
| Physical Volume (PV) | physical device (typically a hdd) |
| Volume Group (VG) | Collection of PV's |
| Logical Volume (LV) | Slice of a VG to create a partition |
| Physical Extent (PE) | Chunks of data in a PV with the same size |
| Logical Extent (LE) | Chunks of data in a LV with the same size |
LVM Howto (a bit dated, but still relevant)
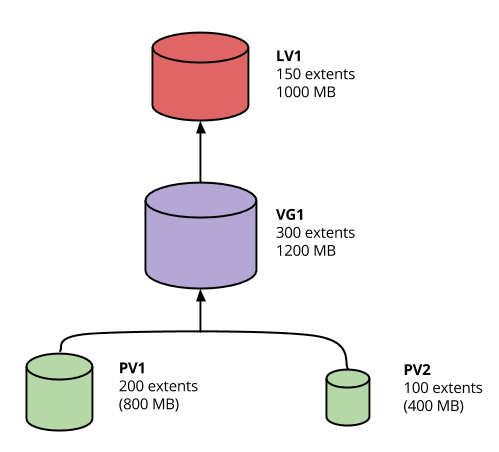
LVM Example
- Two disk partitions: sda1 (800MB) & sdb1 (400MB)
- Format each partition into a PV
- The PV's are divided up into 4MB chunks (PE): sda1 (200PE) / sdb1 (100PE)
- Create a VG using sda1 and sda2
- Create an LV of size 1GB (uses linear mapping by default)
- Total of 250 LE's are required
- 200PE's are used in sda1, 50PE's are used in sdb1, 50PE are free
- Create a filesystem from the LV and mount it
- PROFIT!
LVM Visualized
LVM commands
$ yum install lvm2

# Note: I created loop1/2 using dd and losetup
$ pvcreate /dev/loop0 /dev/loop1
  Physical volume "/dev/loop0" successfully created
  Physical volume "/dev/loop1" successfully created

$ vgcreate lvm /dev/loop0 /dev/loop1
  Volume group "lvm" successfully created

$ lvcreate -n home -L 1G lvm
  Logical volume "home" created

$ mkfs.ext4 /dev/lvm/home
$ mount /dev/lvm/home /mnt
LVM commands
All commands start with pv, vg or lv
pvchange   pvcreate   pvmove     pvresize   pvscan
pvck       pvdisplay  pvremove   pvs

vgcfgbackup    vgconvert      vgextend       vgmknodes      vgs
vgcfgrestore   vgcreate       vgimport       vgreduce       vgscan
vgchange       vgdisplay      vgimportclone  vgremove       vgsplit
vgck           vgexport       vgmerge        vgrename

lvchange     lvm          lvmdump      lvreduce     lvscan
lvconvert    lvmchange    lvmetad      lvremove
lvcreate     lvmconf      lvmpolld     lvrename
lvdisplay    lvmconfig    lvmsadc      lvresize
lvextend     lvmdiskscan  lvmsar       lvs
Useful tricks with LVM
- Move LE's between PV's (linear vs. striped problem)
- Move from one PV to another PV live
- Rename VG's or LV's live
- Reduce, remove or add LV's as needed
- Make atomic snapshots for backups
Issues with LVM
- Requires an initrd if the rootfs is in lvm (although this is default these
days)
- Can be make troubleshooting difficult sometimes
- Can't move LV's between VG's
- If a disk dies, all the PE's are gone (unless RAID is used in LVM)
- Using LVM inside of LVM can be hard to troubleshoot
RAID
Software (mdadm or LVM)
- sda1/sda2 -> md0 -> PV -> VG -> LV - > filesystem
- sda1/sda2 -> PV -> VG -> -LV (raid#) -> filesystem
- mdadm + lvm usually preferred
- Performance has improved quite a bit over the years
Hardware
- Dedicated hardware to RAID
- Prevent boot problems that mdadm may have
- Proprietary tools
- Claim better performance
RAID Levels
| Level | Min disks | Description |
|---|---|---|
| RAID0 | 2 | Striping |
| RAID1 | 2 | Mirroring |
| RAID5 | 3 | Block-level striping with distributed parity |
| RAID6 | 4 | Block-level striping with double distributed parity |
| RAID10 / RAID1+0 | 4 | Striped set from a series of mirrored drives |
Hot spares can automate rebuilds (i.e. RAID5+1 & RAID6+1)
RAID Issues
- Complicate data recovery
- HW Controller limitations and cost
- HW management utility differences
- Multiple disk failures during rebuild
- Performance
Automated Linux Installation
Typical Installation
- Download ISO
- Boot up using a ISO
- Walk through installation questions
- Wait for the install to finish, reboot
- Wait for Linux to boot up on its own
What if...
- You need to do this on hundreds if not thousands of machines?
- Solution:
- Network Booting
- Kickstart / Preseed
Netboot / PXE
- Ability to boot a machine over the network
- Most modern hardware supports network booting via PXE
- Preboot eXecution Environment
- ROM OS sitting on the network card(s)
- DHCP: Tells server where the TFTP server is
- TFTP (Trivial File Transfer Protocol)
- Serves PXELINUX/Kernel/initrd images
- PXELINUX: Minimal bootloader
- Instructs server how to boot
- HTTP or NFS server for serving Kickstart files
Netbooting in Action

Use cases for Netboot
- Automate physical server OS installation
- Provide an easy recovery boot environment
- Easily rebuild machines
- What else?
Netboot install steps
Anaconda / Kickstart
Anaconda is the installation program used by Redhat derivatives
- Provides a text or GUI frontend for users to interact with
- Sets up initial storage, installs base system, sets up initial users
Kickstart is the automation method to install Redhat machines
- Simple and easy to use configuration file format
- Can be served using a variety of methods (i.e. http)
- Extremely configurable and useful for most environment needs
Kickstart Config File
Comprised of three sections
- Command configuration
- Package installation/removal
- Arbitrary shell commands
ks.cfg: Command configuration
install
cdrom
lang en_US.UTF-8
keyboard us
network --bootproto=dhcp
rootpw cs312
firewall --disabled
selinux --permissive
timezone UTC
unsupported_hardware
bootloader --location=mbr
text
skipx
zerombr
clearpart --all --initlabel
autopart
auth --enableshadow --passalgo=sha512 --kickstart
firstboot --disabled
poweroff
user --name=cs312 --plaintext --password cs312
ks.cfg: Package to installation/removal
- Package names must exist in configured repositories
- Prepending a dash (
-) to a package name means to remove the package
%packages
sudo
-vim
%end
ks.cfg: Arbitrary Shell Commands
- Be careful about how complicated the scripts are
- Default interpreter is
sh - Post scripts run inside a chroot environment
- Pre scripts are run on the install environment
%pre --interpreter /bin/bash
echo "This is run before the install phase begins"
%end

%post --interpreter /bin/bash
echo "This is run in a chroot of the installed system"
%end
Kickstart install steps

- System boots from PXELINUX with
ks=<URL>set as a kernel argument. - System boots up, tries to get an IP address and attempts to download the ks file using the URL above.
- Using the ks file, installs the systems. If the ks file doesn't answer all needed questions, installation will stop for user interaction.
- Install with finish and may reboot or shutdown depending on the ks file
DEMO Time!
Time to install CentOS with a Kickstart file!
Demo requirements
- VirtualBox / VMWare / or Parallels installed
- CentOS 7 Minimal ISO
Boot using the ks.cfg
- Setup a VM using defaults
- Boot it up using the ISO image
- Press
ESCto get the boot prompt - Type:
linux ks=http://cs312.osuosl.org/_static/ks.cfg
- Watch CentOS install
- Change boot order to hard disk
- Boot up to a freshly installed Linux
LVM and Kickstart
# Create /boot on sda1 with a 512MB size formatted as ext4
part /boot --fstype="ext4" --size=512

# Create a PV partition using the rest of the disk
# 100 implies 100% in this case instead of size in MB because --grow is
# specified
part pv.01 --grow --size=100

# Create a VG named lvm
volgroup lvm pv.01

# Create an LV named swap using the recommended size and format it
# as swap
logvol swap --vgname=lvm --name=swap --fstype="swap" --recommended

# Create a rootfs named root 20GB in size and format it as ext4
logvol / --vgname=lvm --name=root --fstype="ext4" --size=20480
Other useful ks features
# Set mirror for installation
url --url=http://centos.osuosl.org/6/os/x86_64/

# Add updates repo too
repo --name=updates --baseurl=http://centos.osuosl.org/6/updates/x86_64/

# Setup the installer in a VNC session using a password
vnc --password=cs312

# Run misc commands after the OS install
%post --interpreter /bin/bash --log=/root/post-install.log
echo "%cs312 ALL=(ALL) NOPASSWD: ALL" >> /etc/sudoers
%end
Exercise #1
- Use the ks configuration ks.cfg from the previous slide and install the system on VirtualBox (or other VM software)
- http://cs312.osuosl.org/_static/ks.cfg
Exercise #1 Video
Exercise #2
- Using Github Gists, create a
ks.cfgfile using the previous configuration ks.cfg (delete previous VM) - Modify it to do the following instead:
- Remove
autopartand replace it with a 512M swap partition and the rest as the rootfs as the second partition (i.e. no LVM) - Add a post install script which allows the cs312 user full sudo
- Remove
- Feel free to use a URL shortener service such as http://goo.gl to make it easier to type
NOTE: You need to add noverifyssl to the ks line when using gists
Exercise #2 Video
Resources
Class Announcements
- Readings: Chapters 14-16 & 21 by Friday, Jan 29th
- HW #2 will be assigned on Friday (due date will be pushed back as well)
- Midterm #1:Hopefully graded and returned by Wed or Fri
- Midterm #2: DATE CHANGE: Mon, Feb 15
- Guest Speaker on Fri, Feb 12 from CoreOS